Most new WordPress users don’t recognize the importance of image optimization prior to uploading their posts, which causes lag and latency in their websites. Images can take up more than 60% of modern websites’ total bandwidth. Moreover, a one-second delay in loading a page can shrink the conversion rate by 7%.
Why Does Image Optimization Matter?
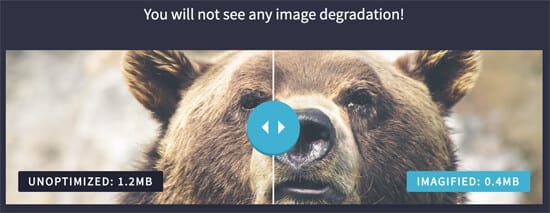
In simple words, image optimization is a process of reducing the size of an image without compromising much of the quality. To reduce the image size in WordPress, many image optimizer plugins are available. Here is an example of an optimized image that is reduced to 1/3rd of its original size without much degradation.

So, if you’re looking to reduce your website load time, you need to optimize images with these top image optimization techniques for WordPress:
1. Downsize Large Images
Assume that you have a large image of 7MP (which is 7×10⁶), and your website requires you to upload a 200×200 pixel image. If you upload it on WordPress without downsizing, it will ask the browser to compress it. This will reduce the image quality and display only 0.0057% of the image.
Therefore, it’s always good to compress before uploading. You can use Image Resize, TinyPNG, ImageMagick, IrfanView, and many other simple online tools to convert your images to a better quality.
2. Use Correct Image File Type
Using a correct image file type is very crucial to enhance your WordPress website’s performance. Typically, you use a JPEG file format when your image is multicolored; use PNG for transparent and simple images; and GIF when animated pictures are being uploaded.
PNG files are uncompressed and heavy. JPEG files are compressed files that lose a bit of quality when further compressed, whereas GIF uses 256 colors with lossless compression.
3. Use Optimized Theme
Not every visitor on your website uses a desktop PC; hence, those who use laptops, smartphones, etc., will experience more loading time due to the big 22” image header of your theme, which won’t fit on their 6” phone screens.
An optimized theme will save your bandwidth by serving medium-sized images. For this, you can use Picturefill.WP to replace image tags with a new <picture> element. This will serve different images based on media queries.
4. Use Progressive JPEG Images
JPEG images are of two types: baseline and progressive. Websites with baseline JPEG images load the complete image, which takes longer for heavy files.
It’s good to use progressive JPEG images because they are made up of several layers and don’t load the whole image at once. The layer-by-layer loading increases the quality and provides a lossless view. You can use Optimus to automatically reduce the file size during the upload.
5. Try Lazy-Loading
Lazy-loading is an efficient way to allow users to only see the image that is in the view of their device. For example, if your website has 10 pictures/page, it will take time to load all of them together.
With lazy-loading, the visitor is required to scroll down the page to see images that are not in view. Thus, significantly reducing excessive HTTP requests. You can use the Lazy Load WordPress plugin for improved load time.


